Episode 1: A New Scope
Why would a JavaScript developer need to know about databases? Well, unless you are just creating static websites, you need to be able to access, manipulate, and edit data. So knowing a little about databases will come in real handy.
I’ll just go ahead and say right now, I’m focusing on SQL (structured query language). SQL and similar languages are used to interact with databases, which is why you’ll hear terms like “SQL-database.” SQL itself, however, is not a database.
I chose to focus on this language because it is very common and the concepts of it will carry over to different databases like MySQL or Postgres. If you’re interested in different types of databases, check out Seven Databases in Seven Weeks.
But, if you’re just interested in enough to get you started on an SQL-like language, you’ve come to the right place.
OK, so what will I use this for?
Let’s say you’ve been tasked with creating a computer system to track who all is onboard the new Death Star. Darth Vader has tasked you with doing this because he force-choked your boss – the guy who miscalculated the shields and left a small exhaust port vulnerable. You’ve been given a list of everyone who is allowed on the Death Star, and you need to devise a system that will check if someone is allowed on board or not. If they are allowed, they’ll be able to come on to the ship. If not – they’ll be blasted.
You want to do a good job for Vader so he doesn’t force-choke you. So you decide the first thing you need to do is put this whole list into a database. This allows you to easily update who is and isn’t allowed on board.
So, let’s create a database for this.
This can be done a few ways. If you are using a GUI tool, like Sequel Pro, there will be options in the menu that allow you to add a database. Most of what is covered here can be done through the GUI tool, but the commands listed below can be used in the command line once you’ve connected to your database server.
There will be times you’ll need to use these types of queries in your JavaScript code to test against items in the database, as well as edit and add items to the database, so it’s good to remember these commands for later.
create database death_star_personnel
Once you’ve created your database, you’ll need to connect to it. Once you’ve connected to your database, you’ll want to start with a table. Let’s build a table for all of the stormtroopers based onboard the Death Star.
create table stormtrooper(id integer, name text,
can_aim boolean default(false), is_alive boolean default(true));
Let’s look at a few things a little bit more closely. Notice the can_aim and is_alive columns are booleans, and to make things easier, I set defaults on them. Initially all stormtroopers are terrible aims, and they all start out alive. This way, I don’t have to type that every time.
But our database doesn’t do us much good without some data in it. Let’s go ahead and add some.
insert into stormtrooper (id, name)
values (1, 'bobby trooper'), (2, 'sally trooper'),
(3, 'tommy trooper'), (4, 'anita trooper'),
(5, 'edgar trooper'), (6, 'cathy trooper');
Oh no! You forgot to add the is_allowed column, to make sure people on the list are allowed on board. Better do that before Vader notices and force-chokes you.
alter table stormtrooper add column
is_allowed boolean default(true);
Now let’s take a look at what all you’ve done.
SELECT * from stormtrooper;
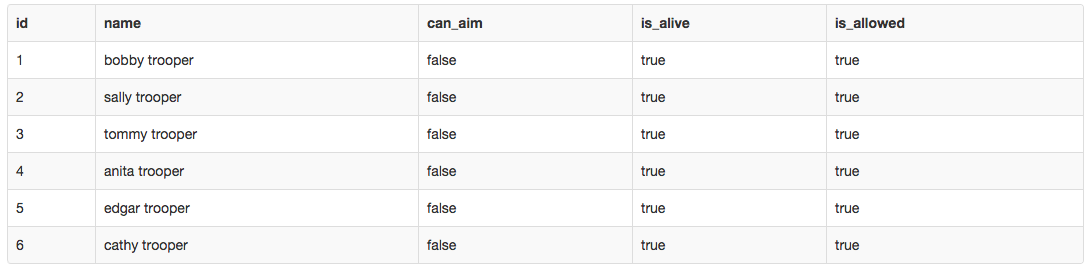
Look what all you’ve accomplished so far! You tell Vader how it’s going, and I’ll start on the next blog post. Good luck!
Note: Many thanks to Rob Sullivan, database extraordinare! Rob was so helpful with checking over this and helping me make sure these queries were exactly right. Thank you, sir!
Questions? Tweet me!
Keep your hair -- plan your program
There’s nothing particularly flashy about standing in front of a whiteboard and planning out a program. It isn’t really fun. It’s way more fun to dive in and just start coding. But diving in can lead to unexpected problems – especially for someone without much programming experience. Without some planning at the beginning, it’s easy to get lost in the details. It’s harder to step back and define what you should be doing and, perhaps more importantly, how you should be doing it.
So even though it isn’t a flashy or fun topic, I wanted to right up a post and go over what planning out a program should look like. Here I am listing my steps to planning out a program. Keep in mind, these are official. I’ve linked to a few more ‘official’ links from universities at the bottom of this post. But like many strong opinions you’ll find regarding programming, this is only my opinion. If there’s a way that works better for you and allows you to complete your program faster and/or better – please, do it that way! (Also, write a blog post on it and send it to me.)
1. What problem are you trying to solve?
All programs come from a similar place – trying simplify something or solve a problem. If you don’t have a good idea of the problem you are trying to solve, you probably aren’t going to get very far. If you’re trying to solve a very complex problem, I recommend breaking it down into multiple smaller problems. This will make it easier to program in little chunks which is not as overwhelming as building an entire program.
2. How are you going to solve this problem?
I am a big proponent of sketching this part out. I’m very visual, so if I can see how it’s going to work, that really helps me. Basically at this point, I like to break down what should happen once the program is opened. I’ll use a game as an example of planning.
Let’s say that I’m tired of all these guys trying to date my sister. Because I am not prone to violence, I decide to make them a video game instead, in hopes of scaring them off. (I am actually working on something like this, and if you’d like to laugh at my first attempt, you can see that here.)
User plays game as me -->
  a guy tries to take my sister out on a date -->
    player uses the arrow keys to navigate to the guy -->
      player uses arrow keys and spacebar to beat guy up -->
        repeat until game ends
The important thing to notice here is that I have planned out the general idea of the program, from start to finish. I could also focus on each action and break that down into a plan as well, but for the sake of time, I’ll leave that out of this.
3. Special considerations
I am hesitant to give this one a number, because you should really keep considerations at the back of your mind for the duration of your project. Considerations include your user base, and which machine they will use to access this. Which browser will they use? What are their technical abilities? These are not things you want to consider when you’ve completed the program. Consider these at the beginning and allow them to guide development. After all, what good is a piece of software that your target users cannot use?
4. Build it!
This part should be pretty self-explanatory.
5. Testing 1..2..3..
I personally do not wait until the end to test my code. I am testing it as I add new features and functionality. I also test at the end to make sure everything works as it should. But that is more for polishing purposes. The ideal situation here is to have tested and planned thoroughly enough so that I am not stumbling across any major functionality issues at this point. I might notice one or two things, but they should be very minor.
6. Show off your code!
Put it on GitHub. Blog about it. Tell everyone!
Additional reading:
Questions? Tweet me!
Wherefore art thou, Hoisting?
So what’s up with hoisting exactly? Well hoisting is when JavaScript takes your declaration and moves it to the very top. This is what would allow you to use call a function before you’ve actually written the function.
shakespeare(); // Though she be but little, she is fierce.

function shakespeare(){
  console.log("Though she be but little, she is fierce.");
}
The code above will go ahead and run the shakespeare function, even though the function is defined below. This is because the defined function is hoisted to the top.
var play = "A Midsummer Night's Dream";
play = "Antony and Cleopatra";
play = "Richard III";

console.log(play); // Richard III
Another effect of hoisting is seen above. When you have one variable defined, and redefined multiple times, JavaScript will assign the last definition it finds.
Perhaps you are wondering why you might assign different definitions to the same variable like that. Let’s take a look at another example.
var backStabber = "Cassius";

function stabCaesar() {
  var backStabber = "Brutus";
  console.log("Et tu," + backStabber + "?");
}

stabCaesar(); // Et tu, Brutus?
console.log(backStabber); // Cassius
In the above example, we have Cassius as one of Caesar’s assassins. While this is correct, in the play Caesar doesn’t say, “Et tu, Cassius?” So I went into the function and assigned “Brutus” to the backStabber variable. This way the quote is correct.
But here is where things get interesting. When I log out backStabber outside of the function, it is still equal to Cassius. I showed you in the example above that if a variable is changed, JavaScript will assign the last definition to the variable. So in this case, it would seem that backStabber should be equal to Brutus, right?
Well not quite. See what I did differently here was two-fold. First, I put Brutus in the stabCaesar function. Next, I used var for a second time when I was defining backStabber. This scopes var backStabber = "Brutus"; to the stabCaesar function. Because this is a local variable, it doesn’t affect the global backStabber variable at all.
This would change if I decided not to use var a second time, or if I moved the contents of stabCaesar outside of the function.
Hoisting can do some tricky things if you don’t know what you are looking for. Some things to remember:
-
Declared variables and functions get hoisted to the top, and are available for use even before they have been technically defined.
-
JavaScript assigns the last definition it finds to a variable that has been defined more than once.
-
Scope can affect the way hoisting plays out if the variable is redefined inside of a function using var.
There are ways to avoid hoisting pitfalls. Namely, be aware of hoisting.
When creating variables in a function, use var to scope them to that function, or leave off var if you are manipulating a global variable that has already been defined. Use unique variable names, and be wary when redefining your variable. This can have unintended consequences.
TL;DR
Hoisting can be confusing, but as long as you are careful in naming your variables, and scoping them to functions properly, you can avoid most issues.
Learn Ionic The Easy Way
Recently I stumbled across an awesome new learning tool, Appcamp.
Appcamp teaches the basics of Angular and Ionic, so that you can use what you know about JavaScript to build mobile apps. If you didn’t already know, I really love Ionic. My project, TwisterJS is built using Angular and Ionic.
Appcamp has four courses: ‘The Basics’, ‘Angular’, ‘User Interface’, and ‘Networking’. I wouldn’t recommend getting started on Appcamp without a firm JavaScript foundation. I would say finish Codecademy’s JavaScript and Angular courses first. (Those can be found here and here.)
‘The Basics’ is pretty simple. It just gets you started on the HTML you’ll need to use building Ionic apps. ‘Angular’ is very similar. It gets you started on Angular concepts, like scope and passing data.
‘User Interface’ is where things start to get really fun. This starts introducing Ionic’s directives, which allow you to create lists, buttons, side menus, popups and so much more. This is where the real meat of your app is going to be. The other two courses are really important, but up to now they are just laying foundation.
And lastly, there is the ‘Networking’ course. It’s the shortest course, but don’t think that means it’s the least important. This course goes over pulling data from an API, and writing data to JSON. This is going to be so important if your app saves any information, or updates any type of information. Think about the Facebook app updating in real time, and the user being able to upload a photo and see it not only on the app, but on the computer as well – instantly.
This is where the ‘Networking’ course will come in handy.
Appcamp is a really great jumping off point, but it is no substitute for practice. Definitely a good place to start before building your first Ionic app, though. I wish I had started off on a tutorial like this before building TwisterJS!
Personally, I would like to see a references section on Appcamp, for newer coders who need to learn more about HTML and JavaScript before jumping into something like this.
If you are getting started on Appcamp, be careful in the ‘Angular’ course. Their courses use chaining on services and controllers, as opposed to just attaching these to an app variable. If you are used to chaining, you’ll be fine. But if you’re used to attaching controllers to your app variable, this might be confusing for you.
Using chains
angular.module('app', ['ionic'])

.controller('Page1Ctrl', function($scope, $state, formData) {
  $scope.user = {};
  $scope.submitForm = function(user) {
    if (user.firstName && user.lastName && user.comments) {
      console.log("Submitting Form", user);
      formData.updateForm(user);
      console.log("Retrieving form from service", formData.getForm());
      $state.go('page2');
    } else {
      alert("Please fill out some information for the user");
    }
  };
})
Using a variable
var app = angular.module('app', ['ionic']);

app.controller('Page1Ctrl', function($scope, $state, formData) {
  $scope.user = {};
  $scope.submitForm = function(user) {
    if (user.firstName && user.lastName && user.comments) {
      console.log("Submitting Form", user);
      formData.updateForm(user);
      console.log("Retrieving form from service", formData.getForm());
      $state.go('page2');
    } else {
      alert("Please fill out some information for the user");
    }
  };
});
If you aren’t used to chaining, this can definitely throw you off. It certainly confused me at first. But once I got the hang of it, I did just fine.
The important thing to watch here is your semicolon. When you use chaining, you’ll only have one semicolon at the very end, as opposed to when you use a variable and each controller ends with a semicolon.
If you have a stray semicolon in your chained version, things will break. (You can take my word for it!)
Overall, I am really happy with Appcamp, and I hope you enjoy it too!
For more info on chaining vs. variables, check out this very informative blog post.
Questions? Tweet me!
Set Your Phaser To Stunning
Recently I built a game for my friend Amanda’s baby shower. (By the way…congrats again, Amanda!!) Everyone laughed at the jokes in the game, so it seemed like an all-around success. You can play the game here.
The game was built in Phaser. Phaser uses JavaScript, which I love and it has loads of built-in functions which made building the game a breeze.
In all, I’d say I worked on the game for about 20-25 hours, and a lot of that was looking things up, with a little bit of debugging misplaced parenthesis. Phaser makes getting started really simple, which is always a plus.
So starting from the beginning, I got the art for the game from Open Game Art, and Ofi helped edit it. The idea actually came from Ofi and Jessica. They wanted to do something different and fun for Amanda’s baby shower.
The game: User (playing as Amanda) will dodge people who are trying to touch her belly.
Since I was on a tight deadline, I didn’t have enough time to make the game work on a mobile phone, as well. That is probably the only thing about this game that I would change. To save myself some time, I used the game from TwisterJS as a foundation. Once Ofi and I figured out the mechanics of the game (left-to-right, across the screen), I was able to get started.
Since Phaser has a lot of stuff built-in, like running and jumping, it was easy to get version 1 out. I had a lot of help testing, and with feedback, I added the awkward things that the strangers say to Amanda. Those are just stored in an array and chosen randomly.
With more testing and feedback, I added comebacks for Amanda to say to the strangers. These are also stored in an array and selected randomly. (If you download the repo on GitHub, you can see these comebacks. Download the repo here.)
I wanted there to be an end to the game, so I gave Amanda limited ‘patience.’ Similar to lives, but when Amanda runs out of patience, the game ends, and she starts swearing in a thought bubble.
To make sure the game would eventually end, I increased the amount of strangers being generated in conjunction with the amount of points the player has. Every 500 or so points, the number of strangers being generated doubles. Phaser has a very handy built-in loop, which made generating the strangers very easy.
The points were just a small function adding the new points to the current points with +=. Because I was trying to discourage people from just standing there hitting the strangers (the goal was to jump on them), I set the hits equal to two points, and the jumps equal to 10.
I wish I had had a little bit more time to build a top-score list, as that could’ve been very fun. All-in-all, this game was very fun to build, and I was so happy to be able to give Amanda and Jesse such a cool gift for their baby shower. I learned a lot, and now I am plotting my next game.
Questions? Tweet me!

